Just in time for Valentine`s Day, a sure fire way to win over your crush or impress your sweetheart, origami cats! Nothing says `I love you` better than a super cute origami cat made with love. They are also really great for decorating your desk! These little bebes stole the show in my dating post and so as promised, a post dedicated to making these cuties!
Supplies needed:
one (at least) piece of origami paper (once you`ve made one it`s hard to stop, they are soooo cute).
a pen or marker
some patience (these cats are a hassle, but worth it)
Lets start!
1. Fold origami paper diagonally in both directions. Also fold horizontally and vertically. After doing each of these folds individually your origami paper should have the following creases.

2. Next you want to push your two horizontal (marked off in yellow) creases into each other at the center, which will cause your origami paper to collapse down into a triangle.

3. Choose either side of the triangle to work with and fold the two triangle flaps facing down in towards the center crease of the triangle.

4. Next, flip your paper over so you are looking at the other triangle on the back, point facing away from you. Again, you want to fold the flaps in towards the center crease but this time fold them up instead of down.

5. Re-open/unfold the flaps from step 4. Now you want to fold the top of the triangle to fit within the folds we just made (pink dots). Afterwards, unfold them again. All of the creases we just made will be important for our next steps.


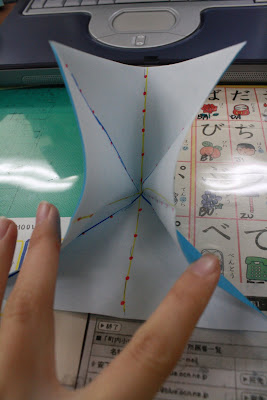
6a. Now for one of the trickier folds (once you`ve got it, it wont prove much of a challenge to re-enact). First, make sure the point of your triangle is pointing away from you. Now, look at the base of the triangle and you will notice that there is a sort of mouth like opening.

6b. Push open the `mouth`/white part of the paper until it folds against the crease we made in step 5 (thicker dots in picture 5 above). Doing this should also cause the triangles flaps to follow. Fold these down against the white of the origami paper. If done properly it should look like this:

7. Now take the top (where my thumb is) and fold it down. You should be able to see the crease we created earlier that I indicated with thick dots. Also, notice that the crease is a divider between a triangle and rectangle shape. This will be the rectangle that I refer to in the next few steps.

8. Next you want to fold the rectangle into itself. So push the bottom in and under until it reaches our middle crease (where the thick dots were) that is our triangles base. Like this:

9. Now take the two end flaps of the rectangle and fold them up to the center crease, creating two little triangles on both ends.

10. Unfold all of these so that we are back to the original triangle figure from step 7. And turn it so the triangle is pointing towards you. (in the photo below, it is facing the wrong way)

** WARNING WARNING**
This next step is the most pain in the arse step! The instructions I was given were extremely vague (fold top of head down inside), but hopefully my instructions and photos will make it a bit more clear/simplified.
11. Notice the blue dots I`ve drawn onto the paper. You will want to fold these in one at a time. But at the same time you will also need to fold the crease marked off in yellow in and down into the little pocket.


This is what it should look like when it`s done. Once you have completed this part, everything that follows is a walk in the park.

12. Now flip the cat over so you are looking at the side of paper with no white showing, keeping the point of the triangle facing you. And fold down the two pointy flaps that you made back in Step 3, like this (the thing sticking up in the middle are the flaps that I am pushing down):

13. Next, fold in the edges of the two flaps we pushed down.

14. Fold the two bottom flaps up, however high or low you want. This will determine the height of your cat. I wanted a baby cat, so I folded the flaps as high as I could.

15. Next you want to flip your cat over so that you are looking at the side with the two white squares. Lift up the bottom of the triangle and fold the point up and under so that it touches the crease. Can you see the beginning of a cute little cat face?


16. Now for our cats ears. Fold the white squares diagonally into the top of the cats head to create cute little pointed ears.

17. Next, flip your cat over again and fold in the edges of the face a bit to give the cat a smaller (thus cuter) face.

18. Flip your cat over one last time and draw in her/his paws and face.

And Meow, you are done!

(Not only have my cats found love, but now they also have a baby kitten!)
2 comments:
Best. Origami Cat. Tutorial. Ever.
AHHHH!!!!! The cuteness!!!
U worked very hard on this blog.
Well done! --UJ
Post a Comment